Best Golf Cart LED Light Kits: Street-Legal vs Basic, What Each Includes, and Powering Them on Lithium
CartVoltage is reader-supported. If you buy through links on this page we may earn a commission at no extra cost to you. As an Amazon Associate we earn from qualifying purchases. Details
A light kit is the most common upgrade on a golf cart after the battery, and the one that generates the most returns, because kits are sold by cart model and year, by legal level, and by voltage, and any of the three can be wrong. This guide sorts the market into the two kinds of kit that exist, shows what each includes, gives the current figures you need to power them from a 36V, 48V or lithium pack, and lists the mistakes that send kits back in the box.
Street-Legal vs Basic Light Kits: What Is in the Box
| Basic LED kit | Street-legal (deluxe) LED kit | |
|---|---|---|
| Headlights | Yes | Yes, usually with high/low beam |
| Taillights | Yes | Yes, with brake function |
| Turn signals and hazards | No | Yes: amber front markers, rear signals, column-mounted stalk |
| Brake light switch | No | Yes: a pad under the brake pedal |
| Horn | No | Yes, often rated for 12V and 48V |
| Wiring | Simple harness to one switch | Plug-and-play harness with inline fuse, dash switch and column cover |
| Typical price | $60 to $150 | $120 to $350 (some branded kits over $500) |
| Install time | 1 to 2 hours | 3 to 5 hours, including brake switch and column stalk |
Who should not buy the deluxe kit: a cart that lives on a golf course or inside a community that forbids street driving gains nothing from turn signals, and the brake-pedal switch and column stalk are the two parts most likely to cause fitment trouble. Buy the basic kit, and spend the difference on the reducer.
Fitment: Why Model and Year Matter More Than Brand
Light kits are shaped to the cart’s cowl and rear body, and they come with cut-out templates for a specific body. The common fitment groups are EZGO TXT (1994.5 to 2013, with a separate kit for 2014 onward), EZGO RXV (2008 to 2015, and 2016 onward), Club Car DS (by year range), Club Car Precedent (2004 onward), and Yamaha G14 to G22, G29 Drive, and Drive2. Gas and electric versions of the same body usually share a kit. Before ordering, confirm the serial number year, and check whether your cart already has factory light holes or a factory harness; some newer carts do, and a factory-style kit drops in without cutting.
Powering Lights on a 36V, 48V or Lithium Cart
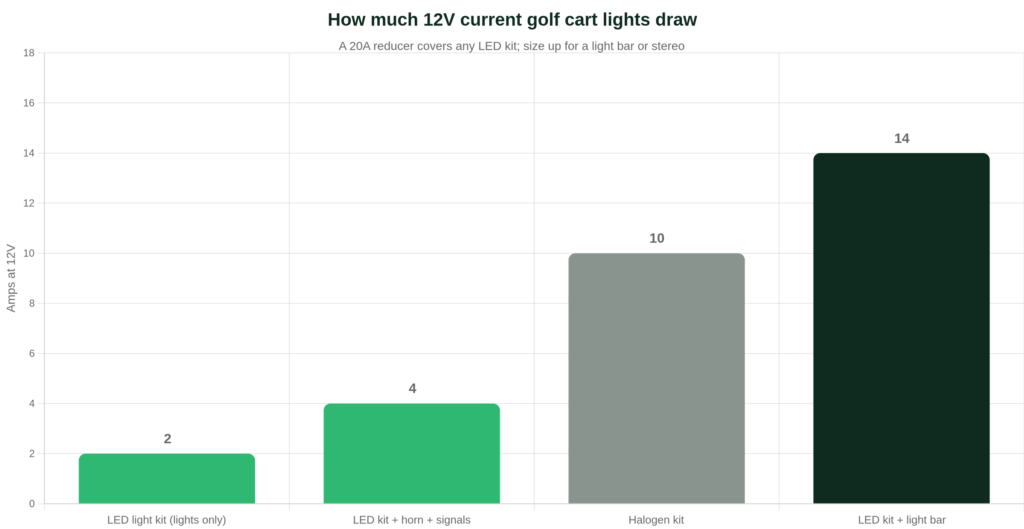
Almost every kit is a 12V kit. On a lead-acid cart, installers used to tap one battery for 12V, which unbalances the pack and shortens its life. On a lithium cart there is nothing to tap. Either way, the correct supply is a 48V to 12V voltage reducer (36V to 12V on a 36V cart) wired through the key switch. Because LED kits draw so little, a 20A reducer is plenty for lights, horn and signals, and a 30A unit leaves room for a stereo or USB ports later (reducer guide, reducer picks). A few kits are sold as “no reducer required, 12 to 48V”; those have a converter built into the harness, which is convenient but means a failed converter takes the whole kit out.
Our Picks
1. Street-Legal LED Kit for Your Model: Best Overall
Look for a kit that lists your exact model and year range, LED headlights with high and low beam, amber turn signals front and rear, a hazard switch, a brake-pedal light switch, a horn, a fused plug-and-play harness and a steering column cover. The Buggies Unlimited ProFX deluxe kits, for example, list 1200 lumen headlights, about 2.8W total draw and a 12V/48V horn, with versions for TXT and Precedent. Kits with these contents are sold on Amazon by several brands at $120 to $200.
2. Basic LED Headlight and Taillight Kit: Best for Course and Community Carts
Two headlights, two taillights, a harness and a switch. Simpler to fit, half the price, and all a cart needs for evening trips to the clubhouse.
3. The Reducer That Powers Either Kit
Installation: What Takes the Time
- Tow mode, key off, main negative disconnected before any wiring (battery wiring diagram).
- Cut the body openings using the kit’s templates and a hole saw or rotary tool. Measure twice; this is the step that cannot be undone, and the reason model-specific kits are worth it.
- Mount the lights and run the harness along the frame, away from the pedals and the battery tray, with zip ties every foot.
- Fit the brake switch pad under the pedal and adjust until the brake light comes on with light pedal pressure but is off at rest. On deluxe kits this takes longer than the lights.
- Mount the reducer on a metal surface with airflow, input fused and key-switched, output to the harness (wiring steps).
- Test every function before refitting the seat: low beam, high beam, left and right signal, hazards, brake light, horn.
Mistakes That Send Kits Back
- Wrong year range. A 1994.5 to 2013 TXT kit will not fit a 2014 TXT; the cowl changed. Check the serial number, not the badge.
- No reducer, or a reducer rated below 60V. A 12V kit wired across one lead-acid battery dims as that battery drains; a reducer with a 50V ceiling fails when a lithium pack charges at 58.4V.
- Dim lights after install. Usually an undersized reducer shared with a stereo, or a poor ground. LED kits themselves draw very little.
- Turn signals flash fast or not at all. LED signals need an LED-compatible flasher; kits include one, but mixing in halogen bulbs or adding extra lamps upsets it.
- Buying “street legal” and assuming it is. The kit provides the lights; your state or HOA decides what else is needed.
Frequently Asked Questions
Do I need a voltage reducer for a golf cart light kit?
On a 36V, 48V or lithium cart, yes, unless the kit states it has a built-in converter or your cart already has a factory 12V supply. A 20A reducer covers any LED kit; 30A leaves room for more accessories. If a stereo is next on the list, size for it now: see golf cart Bluetooth speakers and soundbars.
How many amps does a golf cart LED light kit draw?
About 1 to 2A for the lights and roughly 4A with horn and signals in use, by kit makers’ figures. Halogen kits draw 8 to 12A, which is why they dim on a weak supply.
Will a light kit drain my lithium battery?
Not noticeably while driving: a 4A load at 12V is under 1A from a 48V pack. Wire the reducer through the key switch so nothing draws while parked.
Can I install a golf cart light kit myself?
Yes, with basic tools and an afternoon. The hard parts are cutting the body openings and setting the brake switch; the wiring is plug-and-play on most kits.