Best Multimeter for Golf Cart Batteries: What to Buy and How to Test a Pack
CartVoltage is reader-supported. If you buy through links on this page we may earn a commission at no extra cost to you. As an Amazon Associate we earn from qualifying purchases. Details
A multimeter is the one tool every golf cart owner should keep next to the charger. It finds the weak battery in a lead-acid string, confirms a lithium pack is really charging, checks the 12V side after a reducer install, and tells you whether a dead cart is a battery problem or a switch problem. You do not need an expensive meter for this work. You need one that reads DC volts to two decimal places up to about 100V, carries a real CAT III rating, and survives a drop onto concrete. Below are three meters that meet that bar at three prices, followed by the part most buying guides skip: exactly where to put the probes, what the numbers should be, and the two readings that catch most golf cart faults.
Best Multimeters for Golf Cart Batteries Compared
| Meter | DC volts | Display | Extras | Not ideal if |
|---|---|---|---|---|
| AstroAI DM6000AR | To 1000V, about ±0.8% + 3 digits on the 6 to 600V ranges | 6000 counts, auto and manual ranging | Temperature, capacitance, frequency; 9V battery | You want a meter that will take years of shop abuse |
| Klein Tools MM420 | To 600V, TRMS, auto-ranging | 4000 counts, backlit | Thermocouple, 2 m drop rating, CAT III 600V; 2 x AAA | You need the finest resolution; 4000 counts shows 60.00V max before switching range |
| Fluke 117 | To 600V, ±0.5% + 2 counts, LoZ mode | 6000 counts, bar graph, 4 updates per second | Non-contact voltage detection, 3-year warranty | You test batteries a few times a year; it is several times the price for the same battery readings |
What Matters in a Multimeter for Golf Carts (and What Doesn’t)
- 0.01V resolution on the 60V range. The difference between a good 8V battery (8.49V) and a tired one (8.21V) is 0.28V. A 4000 or 6000 count meter shows it; a 2000 count meter rounds it away. This is the single spec that matters most.
- DC volts to at least 100V. A 72V lithium pack charges above 80V. Every meter here reads to 600V.
- Auto-ranging. With gloves on and your head under a seat, one less dial position to get wrong.
- CAT III 600V and fused leads from a brand that publishes the rating. A golf cart pack can push several hundred amps into a short. Unbranded meters often print “CAT III” without the protection behind it.
- Backlight and drop protection. Battery bays are dark and meters get dropped. The MM420’s 2 m rating is why it is the all-round pick.
- Don’t pay for: TRMS (an AC feature; batteries are DC), a 10A current range (a cart draws hundreds of amps, so you will never clamp a handheld meter inline), or Bluetooth. For live current and state of charge, the right tool is a shunt battery monitor, not a multimeter.
Our Picks
1. AstroAI DM6000AR: Best Budget Multimeter
A 6000-count auto-ranging meter with DC ranges of 6, 60 and 600V at about ±0.8% accuracy, plus temperature, capacitance and frequency. On a 48V pack, ±0.8% means the reading could be off by about 0.4V either way, which is fine for comparing batteries against each other (the error is the same on every battery) but worth remembering if you compare the meter against the voltage chart. It runs on a 9V battery and costs a fraction of a professional meter. For an owner who tests the pack a few times a season, it is all that is required.
2. Klein Tools MM420: Best All-Round
Klein’s MM420 replaces the long-running MM400, which Klein lists as out of production. It is a true-RMS, auto-ranging 600V meter rated CAT III, with a backlit 4000-count display, a thermocouple, and a 2 m drop rating. The thermocouple is more useful on a golf cart than it sounds: after a hill climb, touch it to each battery terminal and cable lug. A connection that reads 15 to 20°F warmer than its neighbours is loose or corroded, and you have found it without a load test. The MM420 is the meter to keep in the cart’s under-seat tray.
3. Fluke 117: Best Professional Multimeter
The Fluke 117 is the electrician’s standard: ±0.5% + 2 counts on DC volts, a 6000-count display that updates four times a second, a LoZ mode that ignores ghost voltage, built-in non-contact voltage detection and a 3-year warranty. The fast display update matters in one golf cart test: watching a battery’s voltage sag the instant the pedal goes down. Slower meters can miss the dip. It costs several times the AstroAI and measures a resting battery no differently, but it will still be in calibration in twenty years.
How Do You Test Golf Cart Batteries With a Multimeter?
- Charge fully and let the cart rest for at least 6 hours, ideally overnight, with no charging and no driving. A battery straight off the charger reads 0.5 to 1V high per battery (surface charge) and will fool you. Lithium settles faster; an hour is enough.
- Set the meter to DC volts (the V with a straight line, not the wavy one). Auto-ranging meters pick the range; on a manual meter choose 200V for the pack and 20V for a single battery.
- Put the probes on the lead posts, not the cable lugs. Pressing on the lug measures the battery plus whatever corrosion sits between lug and post, and can read 0.1 to 0.3V low. You want the battery alone first; the connection gets its own test in step 6.
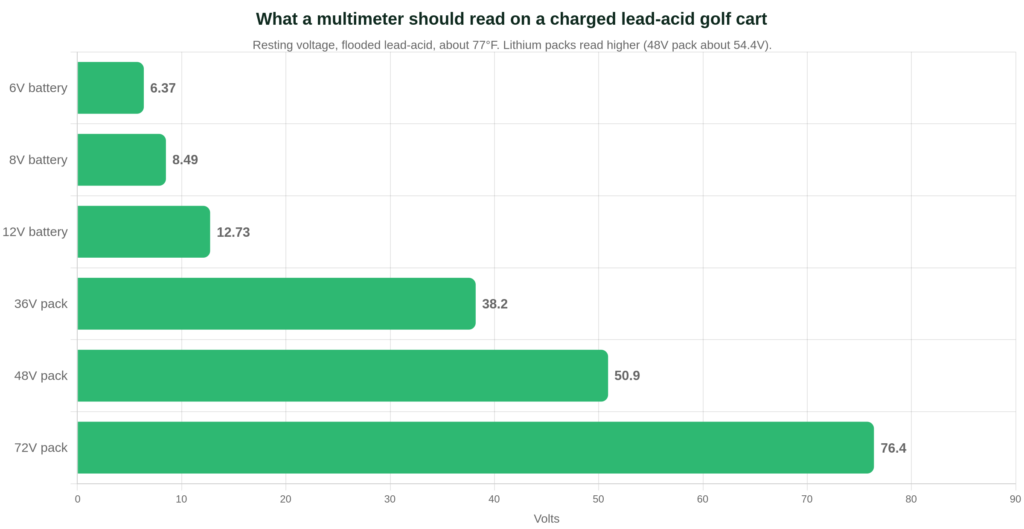
- Read the whole pack: red probe on the main positive post, black on the main negative post. A charged 48V lead-acid pack should read about 50.9V; a 36V pack about 38.2V; a 48V lithium pack about 54.4V. A reading close to half the expected figure almost always means a jumper is reversed or missing after battery work (wiring diagram).
- Read each battery across its own two posts and write the numbers down in order. Healthy batteries in a string sit within about 0.1V of each other. One battery 0.3V or more below the rest is the weak one, and it is dragging the whole pack down (what to do next).
- Test under load, the reading that matters most. With the rear wheels safely off the ground, have a helper hold the pedal down while you measure each battery again. Every battery will sag; a healthy 8V battery typically drops to the high 7V range at a steady cruise, and all six should drop by a similar amount. A battery that sags far more than its neighbours, say to the mid 6V range while the others hold near 7.8V, is failing even though it looked fine at rest. On lithium, a pack that drops hard under load and then shuts off is usually hitting its BMS current limit, not losing capacity (BMS cutoff).
- Find bad connections with a voltage-drop test. Still under load, put one probe on a battery post and the other on the cable lug clamped to it. A clean, tight connection reads under 0.05V. A reading of 0.1V or more across a single terminal is a corroded or loose joint, and that one joint can waste more voltage than a whole good battery. Repeat across each jumper end to end: more than 0.1V across a 12 inch jumper under load means the cable itself is tired (cable guide).
- Check the 12V side at the reducer output if lights or horn are weak: it should hold a steady 12 to 14V with the lights on. A reading that drops when the horn sounds means the reducer is undersized (reducer guide).
Reading the Results: Three Patterns You Will See
| What the meter shows | What it means | Fix |
|---|---|---|
| All batteries read low at rest, but evenly (for example six 8V batteries all near 8.1V the morning after a charge) | Undercharging: the charger is stopping early, or the pack is old and sulfated across the board | Let the charger finish a full cycle, check water (how to water golf cart batteries), consider equalizing flooded batteries; if it repeats, the set is near the end of its life |
| One battery reads 0.3V or more below the rest, at rest or under load | One weak or failing battery | Replace the set on an older pack, or that battery on a young pack; see not holding a charge |
| Pack reads fine at rest, but cart is weak on hills and one terminal is warm | Bad connection or undersized cable, not the batteries | Voltage-drop test each joint, clean and retorque, replace the cable if the drop stays above 0.1V |
Temperature shifts every reading. Trojan’s figures are for about 77°F; a cold pack reads lower and a hot one higher, so compare batteries against each other on the same day rather than chasing a chart value in January.
Other Golf Cart Checks a Multimeter Can Do
- Is the charger charging? Pack voltage should climb within a minute of plugging in, by a volt or more on a 48V pack. If it doesn’t move, see battery won’t charge.
- Is the solenoid closing? Measure across its two large terminals with the pedal down: near 0V means it is closing properly; full pack voltage means it is not pulling in (controller and solenoid).
- Cart won’t move after a conversion? The two-minute multimeter test in this guide narrows it to the battery, the switch or the controller.
- Continuity mode finds a blown fuse or a broken wire without pulling anything apart: the meter beeps if the path is good.
Frequently Asked Questions
What setting do I use on a multimeter to test a golf cart battery?
DC volts. On an auto-ranging meter select V with the straight-line symbol; on a manual meter choose the 200V range for a pack or 20V for a single battery.
What should a 48 volt golf cart read on a multimeter?
About 50.9V for a fully charged, rested lead-acid pack and about 54.4V for a 48V lithium pack. Right off the charger both read higher; let the cart sit first.
Why does my multimeter read higher than the cart’s battery meter?
The dash meter reads after the main cables, solenoid and key switch, so it sees the pack minus every voltage drop in between, and it is often calibrated for lead-acid. The multimeter on the posts is the true figure. A gap of more than about 0.5V between the two under load points to a connection problem worth finding (why the dash meter reads wrong on lithium).
Can a multimeter measure how many amps my golf cart draws?
Not directly: handheld meters are fused at 10A and a cart draws hundreds. Use a DC clamp meter or, for a permanent readout, a shunt-based battery monitor.
Is a cheap multimeter accurate enough for batteries?
A 4000 or 6000 count auto-ranging meter from a brand that publishes its accuracy and CAT rating is accurate enough, because the tests above compare batteries against each other and any small error is the same on every reading. Avoid unbranded 2000 count meters with no safety rating.